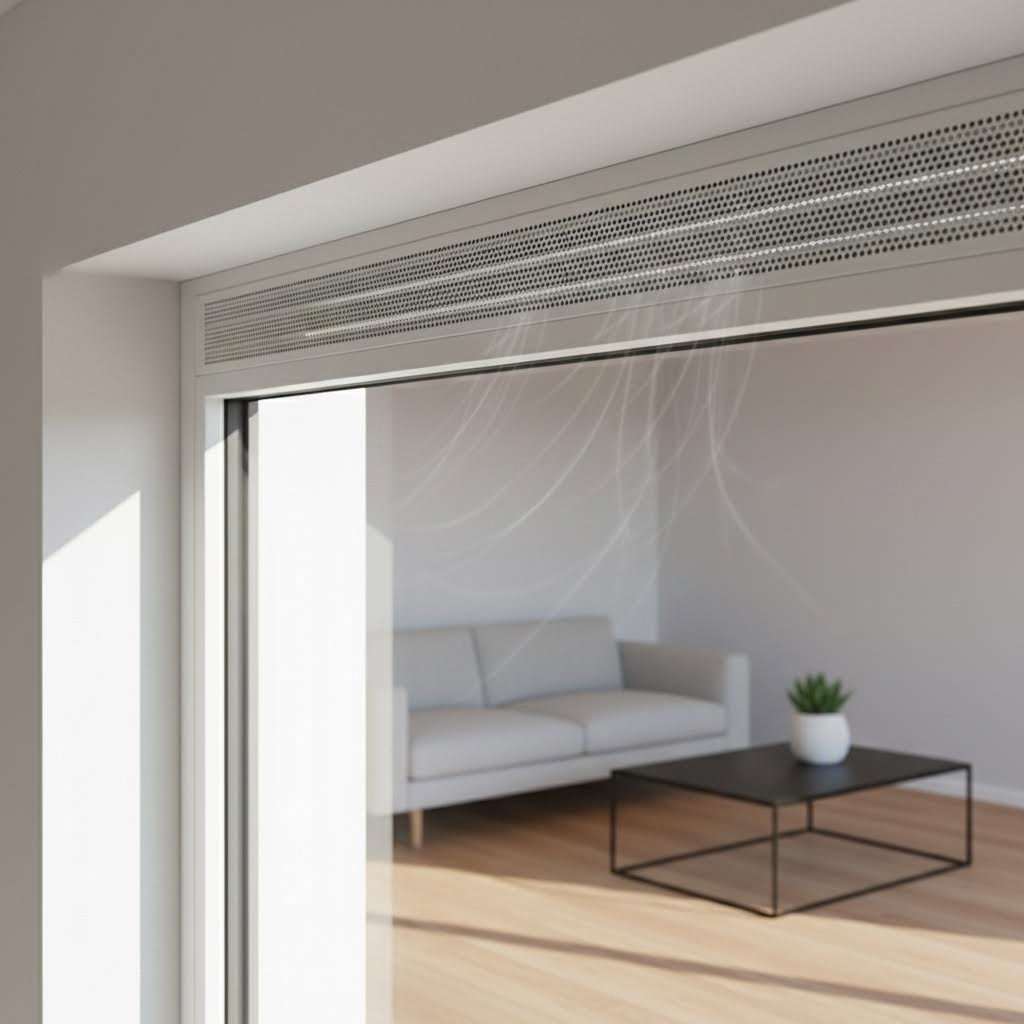
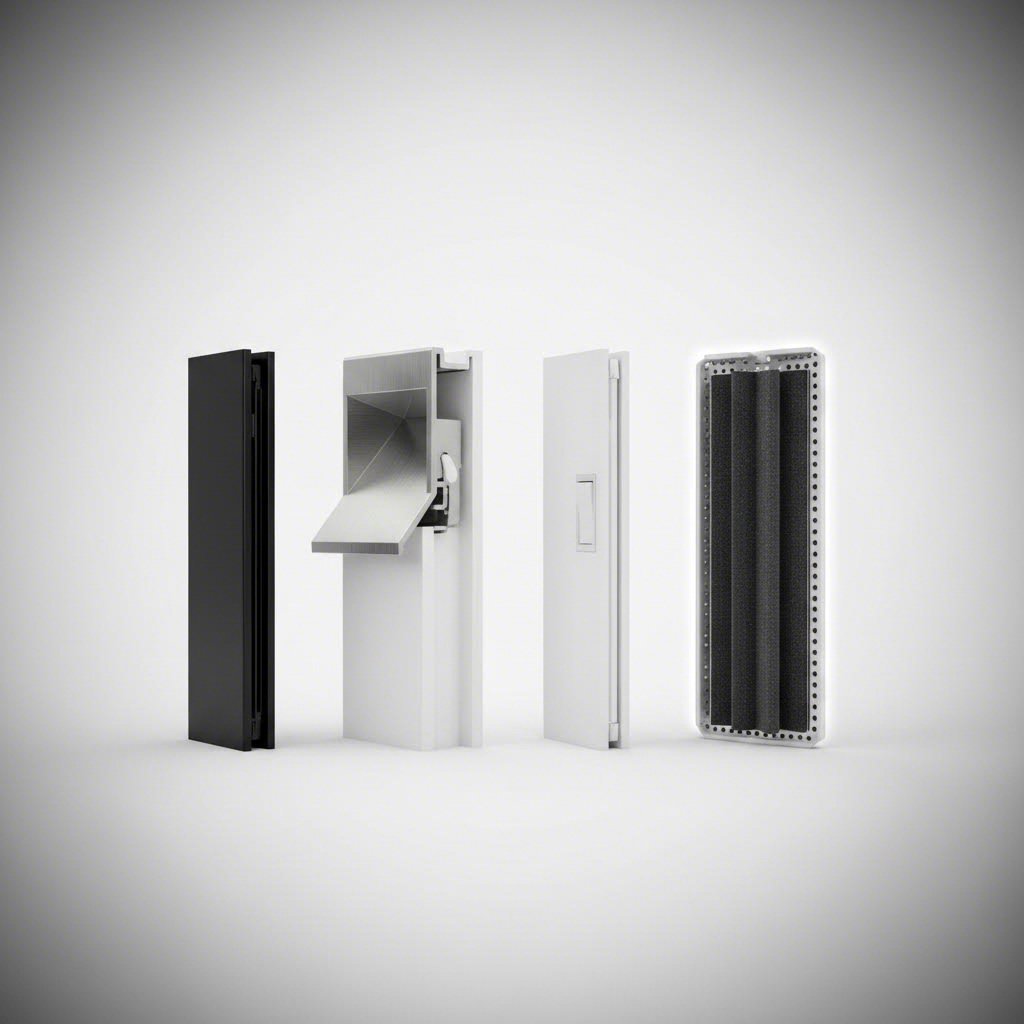
Ever noticed those small slotted openings at the top of your window frames? Those are trickle vents, and they play a surprisingly important role in keeping your home healthy. A trickle vent is a small, controllable ventilation opening integrated into windows, doors, or walls. It allows a steady flow of fresh air into a room while letting stale air escape, all without requiring you to open a window fully.
These unassuming devices solve a real problem that many homeowners face: moisture buildup, condensation, and poor indoor air quality. When you cook, shower, breathe, or even just have houseplants, you generate water vapour. In older, draughtier homes, this moisture naturally escaped through gaps and cracks. But modern buildings are different, and that difference creates challenges.
A well-insulated home keeps heat perfectly inside, but also keeps all the moisture that you and your family produce daily trapped within. Insulation without adequate ventilation is asking for trouble.
Trickle ventilation works on a beautifully simple principle: air pressure differentials. When there is a difference in air pressure between the inside and outside of your home, air naturally wants to move from the higher-pressure area to the lower-pressure one. Trickle vents create a controlled pathway for this movement.
Imagine a narrow slot or aperture positioned in or above your window frame. When outdoor air pressure is higher than indoor pressure, fresh air flows in through the vent. When indoor pressure is higher, stale air flows out. This happens passively, without fans, motors, or any energy input whatsoever. You can adjust the vent's slats to increase or reduce airflow, giving you control over how much ventilation you receive.
The result is continuous, low-level background ventilation that maintains indoor air quality without creating uncomfortable draughts. Sometimes called drip vents in windows or background ventilators, these devices typically provide airflow rates between 3,000 to 8,000 mm² equivalent area per vent, depending on the model and application.
Here is the paradox of modern construction: the better we build, the more we need deliberate ventilation. Energy-efficient homes with tight building envelopes are excellent at keeping heat in and energy bills down. But they also trap everything else inside, including moisture, odours, and pollutants.
Every day, you unconsciously create large quantities of water vapour through breathing, cooking, showering, washing, drying clothes, and even through your plants and pets. In less well-insulated homes, this moisture naturally escapes through natural ventilation via cracks and gaps. But in airtight homes, all that moisture remains trapped.
When warm, humid indoor air meets cold surfaces like windows, external walls, or thermal bridges, condensation forms. You will recognise it immediately: water droplets on your windows, a fogged-up mirror that will not clear, or damp patches in room corners. Left unchecked, this leads to mould formation, structural damage, and health problems.
Trickle vents address this by providing controlled background ventilation that replaces damp indoor air with drier outdoor air. They help reduce condensation, improve indoor air quality, and regulate humidity, all while maintaining security and energy efficiency. For anyone researching trickle vent suppliers, understanding this fundamental purpose is the essential first step toward making an informed purchasing decision.
Now that you understand why trickle vents matter, the next question is: which type do you actually need? Not all window trickle vents are created equal. Each type serves different applications, installation scenarios, and performance requirements. Choosing the wrong one means either a complicated installation, poor performance, or both.
Trickle air vents for windows generally fall into four main categories. The table below breaks down each type so you can quickly match product to application:
| Type | Description | Typical Application | Key Advantage |
|---|---|---|---|
| Slot Vents | Surface-mounted units that sit on top of the frame or sash, requiring a routed channel in the frame head | Retrofit projects, existing windows, social housing upgrades | Simplest retrofit option with minimal structural modification |
| Over-Frame Vents | Mounted above the window frame entirely, attached to the wall or reveal rather than the frame itself | Windows where frame cutting is undesirable, heritage properties, slim aluminium profiles | No frame modification needed, preserves frame integrity |
| Through-Frame Vents | Integrated directly into the frame profile, cut through the frame head section | New builds, factory-fitted windows, uPVC and aluminium systems | Cleaner aesthetic, seamless integration with frame design |
| Acoustic Vents | Engineered with internal baffles and sound-absorbing materials to attenuate noise while maintaining airflow | Urban residential, schools, buildings near roads, railways, or flight paths | Reduces external noise intrusion while meeting ventilation requirements |
When you are looking at trickle vents windows options, the structural differences between these three types determine which one suits your project.
Slot vents are the go-to choice for retrofitting existing windows. They require cutting a narrow channel into the head of the window frame, typically needing as little as 18mm of frame height according to installation specialists. A slim internal vent sits in this channel, with a low-profile external canopy providing weather protection. For uPVC, aluminium, and timber windows, this approach works well provided you check for reinforcement bars first.
Over-frame vents take a different approach entirely. Instead of cutting into the frame, they mount above it, attaching to the wall or window reveal. This makes them ideal when frame drilling is undesirable, when aluminium profiles are extremely slim, or when heritage and aesthetic concerns apply. You will often see these in conservation areas or on listed buildings where altering the original window frame is not permitted.
Through-frame vents offer the cleanest look. These are cut directly into the frame profile during manufacturing, which is why they are standard on new-build windows. The vent becomes part of the frame rather than an addition to it. Most modern uPVC and aluminium window systems are designed with through-frame vents in mind, with profiles that accommodate standard vent widths. The trade-off is that retrofitting through-frame vents to existing windows requires more invasive work than the other options.
Acoustic vents deserve their own category because they solve a problem the other three types cannot: noise. Standard trickle vents, while excellent for ventilation, create a direct pathway for sound to enter your home. In quiet rural areas, this is rarely an issue. In urban environments near busy roads, transport hubs, or flight paths, it becomes a significant concern.
Acoustic trickle vents look similar to standard vents from the outside, but their internal design is fundamentally different. They incorporate complex internal structures that force sound waves to travel through multiple chambers or turns. Sound-absorbing materials line these internal channels, disrupting and dampening sound waves as they pass through. The result is that air flows through freely while noise is significantly reduced.
Many acoustic solutions use a dual attenuator system, combining an internal vent with an external canopy specifically designed to work together for maximum noise reduction. High-performing gaskets improve sealing against weather and enhance acoustic efficiency, particularly when the vent is closed.
The key metric for acoustic vents is the Dn,e,w value, which indicates overall sound reduction performance in decibels. Higher values mean better noise attenuation. When specifying acoustic vents, you should also review frequency response charts from manufacturers, as these reveal how effectively the vent handles specific noise types across the frequency range from 100Hz to 5000Hz.
Acoustic vents are particularly relevant for urban residential projects, schools, and buildings near transport corridors. With denser housing developments becoming more common, the demand for ventilation solutions that balance airflow with noise control continues to grow. Understanding these four vent types puts you in a stronger position when evaluating suppliers and their product ranges, which leads naturally to the question of regulatory compliance.
So you know what trickle vents are and which type suits your project. But here is the question that really matters: do you legally need them? In England and Wales, the answer often comes down to one document: Approved Document F of the Building Regulations.
Part F exists for a simple reason. Without proper ventilation, indoor environments become breeding grounds for airborne viruses, damp, mould, carbon monoxide, nitrogen dioxide, volatile organic compounds, and dust mites. These pollutants contribute to respiratory problems, allergies, and chronic illnesses. They also damage buildings, undermining structural integrity and reducing lifespan. Part F sets out the minimum ventilation standards that protect both people and properties.
The regulations require a combination of ventilation strategies: extract ventilation to remove water vapour and pollutants from specific rooms, whole-dwelling ventilation to supply fresh air throughout the home, and purge ventilation for rapid removal of high pollutant concentrations. Trickle ventilation windows and other background ventilators are one of the recognised means of providing that essential whole-dwelling airflow.
Not every home improvement project requires you to think about window air vents. But more projects trigger Part F than you might expect.
New residential builds are the obvious starting point. Any new dwelling in England and Wales must meet Part F requirements from day one. This means specifying adequate background ventilation, whether through trickle vents, mechanical systems, or a combination of both.
Extensions also fall under Part F. When you add habitable space to your home, that new space needs ventilation that meets current standards. You cannot simply extend an existing ventilation strategy that was designed for a smaller footprint.
Window replacement projects are where many homeowners get caught out. If you replace windows in an existing dwelling, the work must not make ventilation less satisfactory than it was before. In practice, this often means installing trickle vents in the new windows, especially if the old windows had them or if the room lacks other adequate background ventilation.
The UK Government guidance is clear on this point: a disclaimer signed by the homeowner stating they do not wish to have background ventilators, or that they will install them later, is not a suitable way of complying with the Building Regulations. Work must comply in full. Purchasing an indemnity policy is also not an acceptable alternative.
Part F compliance is a legal requirement, not optional guidance. Work that fails to meet ventilation standards cannot be certified by competent person schemes, and installers who carry out non-compliant work face enforcement action.
Understanding the compliance pathway starts with one key concept: equivalent area. This is the standard measurement unit for trickle vent airflow performance, and it appears throughout Part F calculations.
Equivalent area represents the area of a simple circular hole that would pass the same airflow under the same pressure conditions as the ventilator being measured. Why does this matter? Modern ventilator designs include baffles, weather shields, and other elements that limit airflow. The actual physical opening size does not accurately reflect true ventilation capacity. Equivalent area accounts for these limiting factors, giving you a realistic measure of how much air can actually pass through.
When specifying trickle vents in windows for Part F compliance, you need to ensure the total equivalent area in each room meets the minimum requirements set out in the approved document tables. The regulations specify different requirements depending on room type, dwelling size, and the ventilation strategy being used.
For dwellings using continuous mechanical extract ventilation, background ventilators must provide a minimum equivalent area of 4,000mm² for each habitable room. The total number of ventilators should align with the number of bedrooms plus two. Wet rooms like bathrooms and kitchens have different requirements, and background ventilators should be excluded from these spaces when mechanical extract is in use.
The minimum number of ventilators also depends on dwelling size. A one-bedroom dwelling needs at least four ventilators in habitable rooms and kitchens. Dwellings with more than one bedroom need at least five. These ventilators should be positioned at least 1,700mm above floor level to prevent noticeable draughts while remaining accessible for manual operation.
One important exception exists: if you are installing or already have a mechanical ventilation with heat recovery system, trickle vents should not be installed. MVHR systems provide both supply and extract ventilation mechanically, and adding trickle vents would create unintended air pathways that compromise system performance.
For specifiers and buyers evaluating trickle vent suppliers, this compliance framework shapes every purchasing decision. You need products with verified equivalent area ratings that match your project requirements. You need documentation that demonstrates compliance. And you need suppliers who understand these regulations well enough to help you specify correctly. The next consideration is how to verify that a supplier's products actually deliver the performance they claim, which brings us to the testing standards that separate reliable suppliers from the rest.
When you are comparing trickle vent suppliers, how do you know which ones deliver products that actually perform as claimed? Anyone can print impressive numbers on a brochure. The difference lies in independent verification, and that is where BS EN 13141 comes in.
BS EN 13141 is a European standard that establishes testing procedures, performance requirements, and classification systems for ventilation components used in residential buildings. Think of it as the benchmark that separates verified performance from marketing claims. When a supplier can demonstrate BS EN 13141 compliance, they are providing independently tested data rather than self-declared figures. For anyone specifying tickle vents for regulated projects, this distinction matters enormously.
The standard creates a common framework for assessing and certifying ventilation products across Europe. This facilitates trade, supports regulatory compliance, and ensures that buyers have access to products with verified performance characteristics. Without this standardisation, comparing products from different manufacturers would be nearly impossible.
So what exactly does BS EN 13141 evaluate? The standard covers several critical performance areas that directly affect how well a trickle vent will function in real-world conditions.
Airflow performance sits at the heart of the testing regime. Components must meet specified airflow rates under defined pressure conditions. The standard requires testing at multiple pressure differentials, typically at 1, 2, 4, 8, 10, 15, 20, 30, 40, 60, 80, and 100 Pa. This comprehensive approach reveals how a vent performs across the range of conditions it might encounter in service, from calm days to windy exposures.
Weather resistance testing evaluates how effectively a vent prevents water ingress while maintaining airflow. Trickle vents sit on the building envelope, exposed to rain, wind, and temperature extremes. A vent that allows water penetration during driving rain creates problems far worse than the condensation it was meant to prevent. The standard includes water tightness testing under various pressure differentials to verify that products can handle real weather conditions.
Air permeability testing measures how much air leaks through the vent when it is in the closed position. This matters for energy efficiency. A vent that leaks excessively when closed undermines the thermal performance of the window and the building envelope. The standard establishes testing protocols that reveal true closed-position performance.
Durability and environmental resistance testing ensures that components can withstand the conditions typical of residential buildings. Temperature variations, humidity changes, and potential exposure to contaminants all affect long-term performance. Products tested under BS EN 13141 have demonstrated their ability to perform reliably over time.
For acoustic vents, the standard also addresses sound insulation levels. The Dn,e value measures the element-normalised level difference, indicating how effectively the vent attenuates sound transmission. This data point is essential when specifying for noise-sensitive locations.
When you request technical documentation from a supplier, you will receive data sheets filled with numbers and classifications. Understanding what these figures mean helps you make informed comparisons and verify that products meet your project requirements.
Equivalent area at defined pressure differentials is the most important figure for compliance purposes. Look for EA values stated at specific pressure points, typically 1 Pa and 2 Pa for residential applications. The equivalent area represents the size of a simple circular hole that would pass the same airflow under identical conditions. This standardised measurement allows direct comparison between products with different physical designs.
Weather resistance classification indicates how well the vent prevents water ingress. Products are tested with the vent in both open and closed positions under various pressure differentials. Higher pressure ratings indicate better weather protection. For exposed locations or high-rise applications, this classification becomes particularly important.
Acoustic performance data appears as Dn,e,w values for products designed to attenuate noise. Higher decibel ratings indicate better sound reduction. Some manufacturers also provide frequency response data showing performance across the audible spectrum. This detail helps when specifying for locations with specific noise characteristics, such as low-frequency traffic rumble versus higher-frequency aircraft noise.
Air permeability in the closed position reveals how much uncontrolled air leakage occurs when the vent is shut. Lower values indicate better sealing performance, which matters for energy efficiency and draught prevention.
When evaluating any supplier, request the following data points to ensure you are comparing like with like:
A supplier who can readily provide this documentation demonstrates both product quality and technical competence. One who cannot, or who offers only self-declared performance figures without independent verification, should prompt caution. For regulated projects where compliance documentation forms part of the building control sign-off, working with suppliers who understand these requirements saves time and reduces risk.
With testing standards clarified, the next practical consideration is whether the products you are specifying will actually fit your windows. Frame material compatibility varies significantly between vent types, and getting this wrong creates installation headaches that no amount of good performance data can solve.
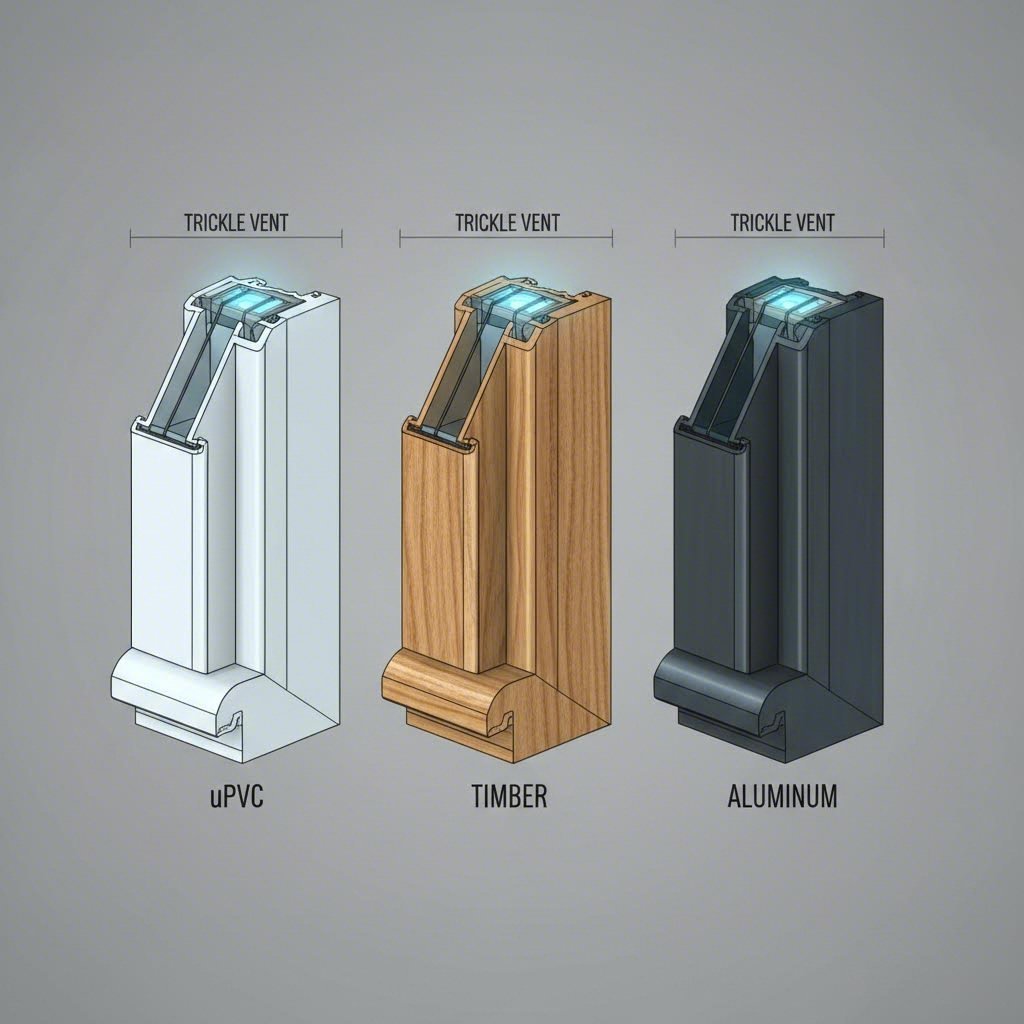
You have found a vent with the right equivalent area, verified the supplier's BS EN 13141 compliance, and confirmed Part F requirements for your project. But here is a question that trips up many buyers: will it actually fit your windows? Trickle window vents are not universal. The frame material dictates which vent types work, how installation proceeds, and what can go wrong if you choose poorly.
The three dominant frame materials in UK residential construction each present distinct compatibility considerations. Get this right, and installation is straightforward. Get it wrong, and you face rework, compromised weather performance, or vents that simply cannot be fitted at all.
| Frame Material | Vent Type Compatibility | Installation Considerations | Common Pitfalls |
|---|---|---|---|
| uPVC | Through-frame vents (standard), slot vents (retrofit) | Most profiles include pre-formed slots or can be routed; vent width must match head section; internal metal reinforcement requires HSS drill bits | Colour mismatch with frame; drilling through reinforcement bars without proper tools; selecting vents too wide for the profile |
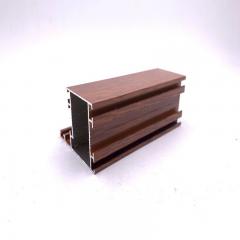
| Timber | Over-frame vents (preferred), slot vents (with care) | Avoid cutting through structural sections; moisture resistance of vent material is critical; dimensional variability requires careful measurement | Weakening frame structure by routing too deep; using non-moisture-resistant vents that degrade; poor sealing leading to water ingress |
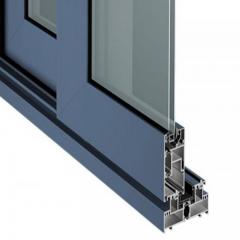
| Aluminium | Through-frame vents (standard), glazed-in vents | Precision tolerances require exact sizing; thermal break considerations apply; slimline profiles may need over-frame alternatives | Disrupting thermal break continuity; vents that do not match extruded profile dimensions; visible fixings on slim frames |
uPVC dominates UK residential window installations, and for good reason. It is durable, low-maintenance, and cost-effective. From a ventilation perspective, uPVC frames are also the most accommodating for trickle vent installation.
Most modern uPVC window systems are designed with through-frame vents in mind. The frame head section typically includes a pre-formed slot or chamber specifically intended for vent integration. When ordering new windows, the fabricator simply fits the vent during manufacturing. The result is a clean, factory-finished installation with no on-site cutting required.
For retrofit projects on existing uPVC windows, the process involves routing a channel into the frame head. This is where things get more technical. uPVC frames typically contain a thin metal reinforcing strip inside the profile. You will need high-speed steel drill bits designed for metal to penetrate this reinforcement cleanly. Standard wood or masonry bits will struggle and may damage the frame.
Vent width is the critical dimension. The vent must fit within the available head section of your specific profile. Measure carefully before ordering. Most window frames are approximately 50mm thick, but the usable width for a vent varies by profile design. Selecting a vent that is too wide for your frame means it simply will not fit, regardless of how good its performance specifications are.
Colour matching matters more than you might expect. White vents on white frames are straightforward, but uPVC windows now come in a wide range of colours and woodgrain finishes. A mismatched vent stands out immediately and detracts from the window's appearance. Reputable suppliers offer vents in multiple colour options to match common frame finishes. When specifying, confirm that your chosen vent is available in a colour that matches your frames.
Aluminium and timber frames each present unique challenges that require different approaches to vent selection and installation.
Aluminium frames are prized for their strength, slim profiles, and contemporary aesthetics. Through-frame vents integrate cleanly into extruded aluminium profiles, becoming virtually invisible when properly specified. The challenge lies in precision. Aluminium extrusions are manufactured to tight tolerances, and vents must match these dimensions exactly. A vent designed for a different profile system will not fit, even if the overall frame dimensions appear similar.
Thermal break considerations add another layer of complexity. Modern aluminium windows incorporate a thermal break, a non-conductive material that separates the inner and outer frame sections to prevent heat transfer. When installing a through-frame vent, you must ensure the vent does not compromise this thermal break. Some thermally broken ventilators are specifically designed for aluminium and uPVC applications, maintaining thermal performance while providing ventilation.
For slimline aluminium profiles where through-frame vents would be too visually intrusive, over-frame or glazed-in alternatives may be more appropriate. Glazed-in vents incorporate into the window's glass unit rather than the frame, providing a seamless appearance that suits minimalist aluminium designs.
Timber frames present different challenges entirely. Wood is a natural material with inherent dimensional variability. It expands and contracts with moisture and temperature changes. This means measurements taken on one day may not hold precisely on another, and vents must accommodate this movement without compromising weather sealing.
Over-frame vents are often the preferred choice for timber windows. They attach above the frame rather than cutting into it, preserving the structural integrity of the wood. Slot vents can work on timber frames, but routing a channel into the frame head requires care. Cut too deep and you risk weakening the frame structure. Cut too shallow and the vent will not seat properly.
Moisture resistance of the vent material itself becomes critical with timber frames. Windows vents installed on timber are exposed to the same moisture conditions as the frame. A vent made from materials that absorb moisture or degrade when wet will fail prematurely and may damage the surrounding timber. Look for vents with weather-resistant housings and effective drainage channels that direct water away from the frame.
For house window vents on any frame material, OEM suppliers who manufacture for specific frame systems offer a significant advantage. Profile-matched vents are designed to integrate precisely with particular window systems, eliminating guesswork about dimensions and compatibility. They simplify installation, maintain weather performance, and ensure the finished result looks intentional rather than retrofitted. When specifying for volume projects or working with less common frame profiles, sourcing from manufacturers who offer this level of customisation reduces risk and improves outcomes.
Understanding frame compatibility is essential groundwork. The next step is knowing where to source the right products, which means mapping the different types of suppliers operating in this market and understanding what each offers.
You know what type of trickle vent window you need, which frame material you are working with, and what compliance documentation to request. Now comes the practical question: where do you actually buy these products? The supplier landscape is more varied than most buyers realise, and choosing the right source depends on your order volume, specification complexity, and how much technical support you need along the way.
Four distinct supplier categories serve the UK market, each with different strengths. Understanding these categories helps you match your procurement approach to your project requirements, whether you are a window fabricator ordering thousands of units or a homeowner replacing a single trickle vent for windows in a retrofit project.
| Supplier Type | Examples | Best For | Typical MOQ | Lead Time Considerations |
|---|---|---|---|---|
| UK Manufacturers | Titon, Glazpart, Renson UK | Fabricators needing fast delivery, projects requiring UK compliance documentation, mixed specifications | Often flexible, from single units to bulk | Typically 1-2 weeks for stock items; custom orders may take longer |
| International OEM Suppliers | Shengxin, various Asian and European manufacturers | Volume orders, branded or profile-matched products, cost-sensitive projects | Usually 500+ units minimum | 4-8 weeks including shipping; longer for custom tooling |
| Trade Distributors | Window hardware wholesalers, building merchants with trade counters | Smaller orders, mixed brand requirements, contractors needing same-day collection | No minimum, single units available | Immediate for stock items; 1-2 weeks for special orders |
| E-commerce Retailers | Amazon, eBay sellers, specialist online hardware stores | Single-unit purchases, DIY retrofit projects, replacement parts | Single units | Next-day to one week depending on seller |
When you are sourcing trickle vents for windows at volume, the choice often comes down to domestic manufacturers versus international OEM suppliers. Each route offers distinct advantages, and the right choice depends on your priorities.
UK manufacturers like Titon have built their reputation on decades of product development and deep understanding of UK building regulations. Domestic production means shorter lead times, typically one to two weeks for standard products. Compliance documentation is straightforward because these manufacturers design specifically for Part F requirements and hold relevant UK certifications. When building control asks for test certificates or performance data, a UK manufacturer can usually provide exactly what you need without translation or interpretation issues.
The trade-off is cost. UK manufacturing carries higher labour and overhead costs, which translates to higher unit prices. For small to medium orders or projects with tight timelines, this premium is often worth paying. For high-volume orders where cost efficiency matters, international OEM suppliers become attractive.
International OEM manufacturers offer significant cost advantages at scale. Shengxin, for example, provides profile-matched trickle vents for uPVC and aluminium frames with rigorous quality testing, offering the kind of customisation that allows fabricators to order vents designed specifically for their window systems. This profile-matching capability eliminates the fitting issues that arise when using generic vents on proprietary frame profiles.
The OEM route requires planning. Lead times of four to eight weeks are typical, extending further if custom tooling or specific colour matching is required. You will also need to manage import logistics, though established OEM suppliers typically handle shipping and customs documentation as part of their service. For fabricators running continuous production lines, building OEM orders into a forward planning cycle makes this lead time manageable.
One consideration that catches some buyers off guard is compliance documentation. International suppliers can provide BS EN 13141 test data and CE marking, but you may need to verify that their documentation meets UK requirements, particularly for UKCA marking post-Brexit. Reputable OEM suppliers understand these requirements and can provide appropriate certification, but it is worth confirming before placing large orders.
Not every project justifies going direct to a manufacturer. Trade distributors and direct manufacturer relationships serve different needs, and understanding when to use each saves time and money.
Trade distributors stock products from multiple brands, giving you flexibility to mix and match specifications within a single order. If your project requires standard slot vents for most windows but acoustic vents for bedrooms facing a busy road, a distributor can supply both from their existing stock. This flexibility is valuable for contractors working on varied projects where specifications change from job to job.
Distributors also offer immediacy. When you need a t vent or replacement part today, a trade counter with stock on hand beats any manufacturer lead time. For reactive maintenance work or small retrofit projects, this accessibility matters more than unit cost savings.
The limitation of distributors is depth of technical support. Distributors excel at logistics and availability but may not have the product engineering expertise to help you solve unusual specification challenges. If you are working with a non-standard frame profile or need custom equivalent area calculations, you will likely need to engage directly with a manufacturer.
Direct manufacturer relationships make sense when you have consistent, predictable demand. Window fabricators who produce hundreds or thousands of units monthly benefit from establishing supply agreements directly with manufacturers. These relationships often include volume pricing, priority production slots, and dedicated technical support. Manufacturers invest in understanding your specific requirements and can adapt products to suit your production processes.
For procurement teams evaluating suppliers, consider these factors:
The supplier landscape continues to evolve as e-commerce platforms make it easier for international manufacturers to reach UK buyers directly. This creates opportunities for cost savings but also requires buyers to be more diligent about verifying product quality and compliance credentials. A low price means nothing if the product fails to meet Part F requirements or arrives without the documentation needed for building control sign-off.
With the supplier landscape mapped out, the next step is understanding how to navigate the specification process itself, from selecting the right control mechanism to calculating the equivalent area your project actually requires.

Feeling overwhelmed by the options? You are not alone. With vent types, frame materials, compliance requirements, and supplier categories all competing for attention, the specification process can feel like navigating a maze. But it does not have to be complicated. When you break it down into a logical sequence, each decision builds naturally on the one before.
This trickle vent specification guide walks you through the five essential steps that lead to a compliant, well-fitted installation. Whether you are a specifier working on a multi-unit development or a homeowner tackling a single window retrofit, following this framework ensures you cover all the bases before placing an order.
Sounds straightforward? It is, once you understand what each step involves. The first two steps you have already covered if you have read the earlier sections on vent types and frame compatibility. Steps three through five deserve closer attention because they directly determine whether your installation will perform as intended and pass building control inspection.
Not all trickle vents operate the same way. The control mechanism determines how occupants interact with the vent and how the vent responds to changing conditions. Choosing the wrong mechanism creates either frustrated occupants or wasted energy, sometimes both.
Fixed open vents are the simplest option. They provide continuous background ventilation with no moving parts and no occupant intervention required. Air flows through constantly, regardless of indoor conditions. This simplicity has advantages: nothing to break, nothing to adjust, nothing to forget. For commercial buildings, rental properties, or situations where you cannot rely on occupants to manage their ventilation, fixed vents ensure consistent airflow. The downside is inflexibility. On cold, windy days, occupants may feel draughts they cannot control.
Manually closeable vents give occupants direct control. A slider or flap allows the vent to be opened or closed as conditions demand. When it is cold outside, occupants can reduce airflow. When cooking or showering generates excess moisture, they can open the vent fully. This flexibility makes manual vents popular in residential settings where occupants want to balance comfort with ventilation. The risk is that occupants close vents and forget to reopen them, leading to condensation and air quality problems over time. Ventilation specialists recommend keeping trickle vents open most of the time for optimal moisture control.
Humidity-controlled vents represent the most sophisticated option. These vents incorporate sensors that detect moisture levels in the air and automatically modulate airflow in response. When indoor humidity rises, the vent opens wider. When humidity drops, it partially closes. This automatic response maintains adequate ventilation while minimising unnecessary heat loss during dry periods.
The mechanism typically uses a humidity-sensitive material that expands or contracts based on moisture content. No electrical connection is required, making installation straightforward. For energy-conscious projects or buildings where occupant behaviour is unpredictable, humidity-controlled vents offer a compelling balance between compliance and efficiency.
Pressure-controlled vents work on a similar principle but respond to air pressure differentials rather than humidity. When wind pressure increases on the building facade, the vent partially closes to prevent excessive airflow and draughts. This makes them particularly suitable for exposed locations or high-rise buildings where wind loads vary significantly.
When deciding which mechanism suits your project, consider these questions:
Here is where many buyers get stuck. You know you need a certain amount of ventilation, but how do you translate that into a specific product specification? The answer lies in understanding how equivalent area calculations work.
Equivalent area, measured in mm², represents the effective airflow capacity of a ventilator. It accounts for all the internal restrictions, baffles, and weather protection features that reduce airflow compared to a simple open hole. When Part F specifies minimum ventilation requirements, it does so in terms of equivalent area because this measurement reflects real-world performance rather than theoretical opening size.
The calculation logic follows a straightforward pattern. First, identify the room type. Habitable rooms like bedrooms and living rooms have different requirements than wet rooms like bathrooms and kitchens. Second, determine which ventilation system the dwelling uses. Dwellings with continuous mechanical extract ventilation have different background ventilation requirements than those relying on natural ventilation alone.
For dwellings using background ventilation as part of a continuous mechanical extract system, each habitable room typically requires a minimum equivalent area of 4,000mm². The total number of background ventilators should equal the number of bedrooms plus two. So a three-bedroom dwelling needs at least five background ventilators distributed across habitable rooms.
The minimum airflow rate also depends on floor area. Part F specifies a minimum of 0.3 litres per second per square metre of internal floor area. For a 20m² bedroom, that translates to 6 l/s minimum airflow. You can convert between equivalent area and airflow rate using standard formulas, though online calculators make this conversion straightforward.
When specifying vents, always reference the current Approved Document F tables for your specific project type. The regulations distinguish between new builds, extensions, and replacement windows. They also account for dwelling size, with different minimum ventilator counts for one-bedroom versus multi-bedroom properties. Using outdated figures or applying the wrong table creates compliance gaps that building control will identify.
One practical tip: it is better to slightly over-specify than under-specify. A vent with 4,500mm² equivalent area costs little more than one with 4,000mm², but it provides a compliance margin that accommodates measurement tolerances and installation variations. Under-specifying by even a small amount can trigger a failed inspection and costly remediation.
For acoustic vents, remember that sound attenuation features reduce equivalent area compared to standard vents of the same physical size. An acoustic vent that looks identical to a standard vent may deliver significantly less airflow. Always check the equivalent area specification for the acoustic variant specifically, not the standard product in the same range.
Quick-reference checklist: 1) Identify vent type based on application. 2) Confirm frame compatibility. 3) Select control mechanism. 4) Calculate required equivalent area from Part F tables. 5) Verify supplier compliance documentation before ordering.
Following this five-step framework transforms what seems like a complex specification challenge into a manageable sequence of decisions. Each step narrows your options until you arrive at a specific product that meets your technical requirements, fits your frames, and comes with the documentation you need for compliance.
But what if you are not installing new windows? Many projects involve adding ventilation to existing frames without full replacement. That scenario brings its own set of considerations, which is exactly what the next section addresses.
Been told that adding ventilation to your existing windows means replacing them entirely? That advice is often wrong. Retrofit trickle vents offer a practical alternative that improves indoor air quality without the cost and disruption of full window replacement. Whether you are a homeowner tackling condensation problems or a housing association upgrading ventilation across a portfolio, understanding your retrofit options opens up possibilities you might not have considered.
The good news is that almost every window can accommodate background ventilation if the correct approach is used. The real question is not whether trickle vents can be retrofitted, but which retrofit method suits the specific window in front of you.
Two primary methods dominate the retrofit market, each suited to different situations and frame conditions.
Over-frame vents represent the least invasive option. These units attach to the existing frame head or the wall above the window without requiring any cutting into the frame itself. You simply fix the vent above the window, and it provides background ventilation through a pathway that bypasses the frame entirely. This approach is widely used in social housing retrofit programmes where speed, cost-efficiency, and minimal disruption matter. For heritage properties or windows where frame modification is undesirable, over-frame vents preserve the original joinery while still delivering compliant ventilation.
Slimline slot vents offer a more integrated solution when frame space permits. Modern retrofit designs require as little as 18mm of frame height, which means they can fit in situations where older, bulkier vents would never have worked. The installation involves cutting a narrow slot in the head of the window frame, installing a slim internal vent, and fitting a low-profile external canopy for weather protection. In most uPVC, aluminium, and timber windows, this is achievable without weakening the structure, provided reinforcement positions and profiles are checked first.
When neither method works due to reinforcement bars, sightlines, or decorative constraints, glazed-in trickle vents provide a third option. This approach avoids cutting the frame altogether. The existing sealed glass unit is removed, a new unit is manufactured approximately 45mm shorter, and a glazed-in vent clips into the opening above the new glass. This method often surprises homeowners who were told retrofitting was impossible.
Each frame material responds differently to retrofit work. uPVC windows are among the easiest to retrofit because slimline vents often fit above the internal reinforcement, and glazed-in vents bypass reinforcement entirely. Aluminium frames are frequently described as too slim, but slimline frame vents often fit, and where they do not, glazed-in alternatives work well. Timber windows are highly adaptable, though appearance matters. Glazed-in vents often provide the cleanest solution for timber frames where aesthetics are a priority.
Sometimes the challenge is not adding ventilation but temporarily or permanently closing an existing vent. A trickle vent blanking plate serves exactly this purpose. These simple covers fit over or into an existing vent opening, sealing it against airflow.
Common scenarios where blanking plates prove useful include repainting or decorating work where you need to prevent paint fumes from entering through the vent, temporary closure during extreme weather events, situations where a room's ventilation strategy has changed and the vent is no longer needed, and buildings where mechanical ventilation with heat recovery has been installed, making trickle vents redundant.
Blanking plates are straightforward to install and remove, making them ideal for temporary closures. For permanent closure, ensure that removing the vent does not create a Part F compliance gap. If the room relies on that vent for background ventilation and no alternative provision exists, blanking it permanently could create problems with condensation and air quality.
If you are planning a retrofit installation on trickle vent existing windows, following a structured approach prevents costly mistakes. Here are the practical steps to work through:
Some suppliers offer retrofit-specific product lines designed to simplify installation on existing windows. These may include adhesive-fix systems that bond directly to the frame surface without drilling, or clip-fit mechanisms that secure into existing frame channels. Such systems avoid frame modification entirely, reducing installation time and eliminating the risk of structural damage. When sourcing retrofit vents, ask suppliers specifically about their retrofit range and whether they offer fixing systems suited to your frame type.
Retrofitted vents consistently improve comfort and air quality when expectations are realistic. They improve background airflow, which helps reduce surface condensation by allowing moist indoor air to escape gradually. However, they do not extract moisture, they do not replace bathroom or kitchen extract fans, and they work best as part of a wider ventilation strategy rather than a standalone solution.
With retrofit options clarified, the final piece of the puzzle is understanding the practical factors that affect every purchase: cost, sizing constraints, and installation difficulty. These considerations shape which products make sense for your specific project and budget.

How much will this actually cost? Will it fit my windows? Can I install it myself? These are the questions that matter most when you are ready to buy, yet they are surprisingly difficult to answer from most supplier websites. Let us cut through the ambiguity and give you the practical information you need to budget, specify, and plan your trickle vent installation with confidence.
The table below consolidates the key factors that affect every purchasing decision. Use it as a quick reference when comparing products and planning your project:
| Factor | Typical Range or Consideration | Notes |
|---|---|---|
| Unit Cost | Varies significantly by type and specification; acoustic vents cost more than standard slot vents; OEM orders reduce per-unit cost at volume | Consider both initial purchase price and potential long-term energy savings; humidity-controlled vents carry a premium but may reduce heating costs |
| Sizing | Vent width constrained by frame head section (typically 265mm to 700mm internal length); EA requirement determines minimum number of vents per room | Measure fixing centres carefully; standard sizes range from 242mm to 658mm between screw holes; wider vents can bridge existing slots if upgrading |
| Installation Difficulty | Over-frame vents are DIY-accessible; through-frame vents typically require a window fabricator or experienced installer | uPVC frames with metal reinforcement need HSS drill bits; incorrect installation compromises weather performance and may void warranties |
Trickle vent sizing is not arbitrary. You cannot simply pick the smallest vent that physically fits and assume it will do the job. Sizing is driven by compliance calculations, and undersized vents create a compliance gap even if they are physically installed and functioning.
The critical measurement is equivalent area, not physical dimensions. A vent that looks large enough may still fall short of Part F requirements if its internal design restricts airflow. When you look at product specifications, you will see EA ratings expressed for different slot widths. A 13mm slot delivers less equivalent area than a 16mm slot through the same vent body. If your frame has a 13mm slot but you need 4,000mm² equivalent area, you may need a longer vent or multiple vents to achieve compliance.
Physical dimensions matter for fit, not performance. Internal length ranges from around 265mm for compact vents up to 700mm for high-capacity units. Height typically falls between 18.5mm and 22mm, while closed depth ranges from 16mm to 23mm. The dimension that catches most buyers out is fixing centres, the distance between screw holes. If your existing frame has slots or screw holes from a previous vent, you need a replacement with fixing centres that either match exactly or are wider so you can drill new positions that clear the old ones.
For new installations, calculate your room's EA requirement first, then select vents that meet or exceed that figure. A bedroom requiring 4,000mm² equivalent area might be served by a single high-capacity vent or two smaller units. Larger rooms or those with higher occupancy may need multiple vents regardless of individual vent capacity. Always verify that your total installed EA meets Part F minimums for the specific room type and dwelling ventilation strategy.
One sizing consideration that often gets overlooked is acoustic vents. Sound attenuation features reduce equivalent area compared to standard vents of the same physical size. An acoustic vent with identical external dimensions to a standard vent may deliver 30% less airflow. Always check the EA specification for the acoustic variant specifically, not the standard product in the same range.
Can you install trickle vents yourself, or do you need a professional? The honest answer depends on the vent type, your frame material, and your confidence with DIY projects.
Over-frame vents are the most accessible option for competent homeowners. These units attach above the window frame using screws into the wall or reveal. No frame cutting is required, and the installation is similar to fitting a shelf bracket. If you can drill into masonry and drive screws straight, you can likely handle an over-frame vent installation. The main challenge is ensuring the vent is level and properly sealed against weather.
Slot vents on existing windows require more skill. You need to route a channel into the frame head, which means working with a router or specialist cutting tool. For uPVC frames, this gets complicated by internal metal reinforcement. As installation guides note, uPVC windows may have steel or aluminium reinforcement inside the frame which can make the whole task a lot harder. You will need high-speed steel drill bits designed for metal, and even then, the work requires precision to avoid damaging the frame profile.
Through-frame vents on new windows are typically factory-fitted by the window fabricator. This is the cleanest approach because the vent integrates during manufacturing, with no on-site cutting required. If you are ordering new windows, specify vents at the point of order rather than planning to retrofit later.
Retrofitting through-frame vents to existing windows is trade-only territory for most homeowners. The work involves cutting through the frame profile, potentially through reinforcement, and ensuring the slot dimensions match the vent exactly. Get this wrong and you compromise weather sealing, structural integrity, or both. Many double glazing repair companies offer this service if you prefer professional installation.
Frame material affects difficulty significantly. uPVC is the most forgiving because the material cuts cleanly and most profiles are designed with ventilation in mind. Timber requires care to avoid weakening the frame structure, and any cuts must be sealed against moisture to prevent rot. Aluminium demands precision because extrusions are manufactured to tight tolerances, and vents must match these dimensions exactly.
For volume projects or situations where standard vents do not fit your frame profile, manufacturers like Shengxin offer OEM capabilities that allow specifiers to order profile-matched vents sized to exact frame dimensions. This approach eliminates on-site fitting complexity because the vents arrive ready to install without modification. For fabricators running production lines or contractors managing multi-unit developments, profile-matched vents from an OEM supplier reduce installation time, minimise fitting errors, and ensure consistent results across the project.
Whatever your installation approach, remember that incorrect installation compromises more than aesthetics. A poorly fitted vent may leak air when closed, allow water ingress during rain, or fail to deliver its rated equivalent area. If you are uncertain about your ability to complete the work correctly, hiring a professional is money well spent compared to remediation costs later.
When selecting a trickle vent supplier, prioritize those who can provide BS EN 13141 compliance documentation, verified equivalent area ratings, and CE or UKCA marking. Reputable suppliers like Shengxin offer rigorous quality testing and comprehensive OEM capabilities for profile-matched vents. Also consider lead times, minimum order quantities, and whether the supplier offers technical support for specification challenges specific to your frame material.
Yes, under UK Building Regulations Part F, trickle vents are often legally required. New residential builds, extensions, and window replacement projects in England and Wales must meet minimum ventilation standards. If you replace windows, the work must not make ventilation less satisfactory than before, which typically means installing trickle vents with sufficient equivalent area to meet Part F requirements.
Absolutely. Retrofit options include over-frame vents that attach above the window without cutting the frame, slimline slot vents requiring minimal frame modification, and glazed-in vents that bypass the frame entirely. Most windows can accommodate background ventilation with the correct approach. OEM suppliers offer retrofit-specific product lines with adhesive or clip-fit systems that simplify installation on existing uPVC, aluminium, and timber frames.
UK manufacturers like Titon offer shorter lead times of one to two weeks and straightforward compliance documentation for Part F requirements. International OEM suppliers such as Shengxin provide significant cost advantages at volume, profile-matched customization for specific window systems, and rigorous quality testing, though lead times typically extend to four to eight weeks. The choice depends on order volume, timeline flexibility, and budget priorities.
Equivalent area requirements depend on room type and dwelling ventilation strategy. For dwellings using continuous mechanical extract ventilation, each habitable room typically needs a minimum of 4,000mm² equivalent area. The total number of ventilators should equal bedrooms plus two. Reference current Approved Document F tables for your specific project type, and consider slightly over-specifying to provide a compliance margin that accommodates installation variations.


 บริการออนไลน์
 0086 136 3563 2360
 sales@sxalu.com
 +86 136 3563 2360
 ไทย
ไทย English
 français
 Deutsch
 русский
 español
 português
 العربية
 Việt
Việt Українська