When a window sticks, drifts, or refuses to lock, the problem is often not the frame or the glass. It is usually one of the working parts that makes the sash move and seal. Many homeowners search for aluminum window parts, parts of a home window, or general window repair parts without knowing the catalog name for the item they need. A clear definition helps close that gap before measurements and replacement choices start to matter.
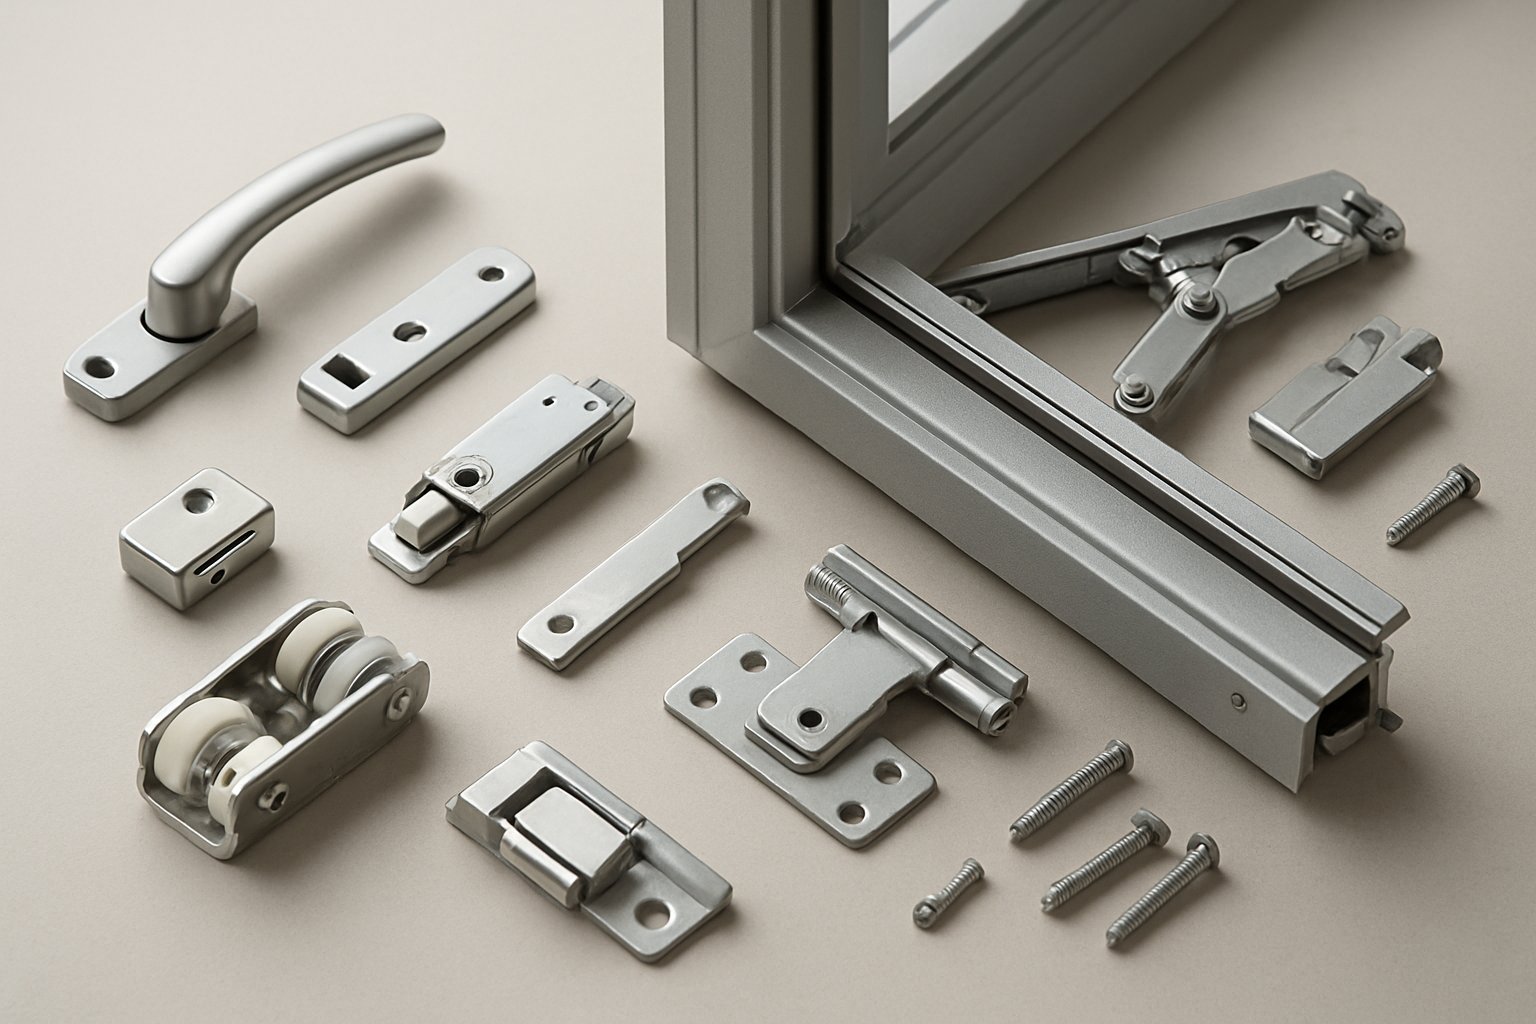
Aluminum window hardware is the operating system of a window, including rollers, handles, locks, hinges, guides, stays, restrictors, balances, and fasteners that help the sash open, close, stay in position, lock, and seal properly.
Think of a window in two layers. The frame and sash hold the glass in place. The hardware makes the unit function. Reference glossaries place locks, handles, hinges, guides, and balances in that working category, while supplier classifications also sort these items by job, such as transmission parts, load-bearing parts, and locking parts. In simple terms, if a part helps the sash move, support weight, or secure shut, it belongs in the hardware group.
The language changes depending on who is talking. A homeowner may say slider part, while a catalog may list pulley, guide, or hinge set. That mismatch is why definition-style searches are so common.
No component works alone. A handle or operator starts the motion. Hinges, rollers, stays, or balances support and control that movement. Locks secure the sash, and guides help it travel in the right path. That is why a window that seems to have a lock issue can actually trace back to a worn support part. The picture gets sharper when you match the hardware family to the window style, because a sliding unit and a hinged unit may use parts that look similar but work in completely different ways.
A part only makes sense when it matches the way the sash moves. Two pieces may look nearly identical in a product photo, yet one belongs on a slider and the other on a hinged unit. That is why window style is the quickest way to narrow the field before you buy.
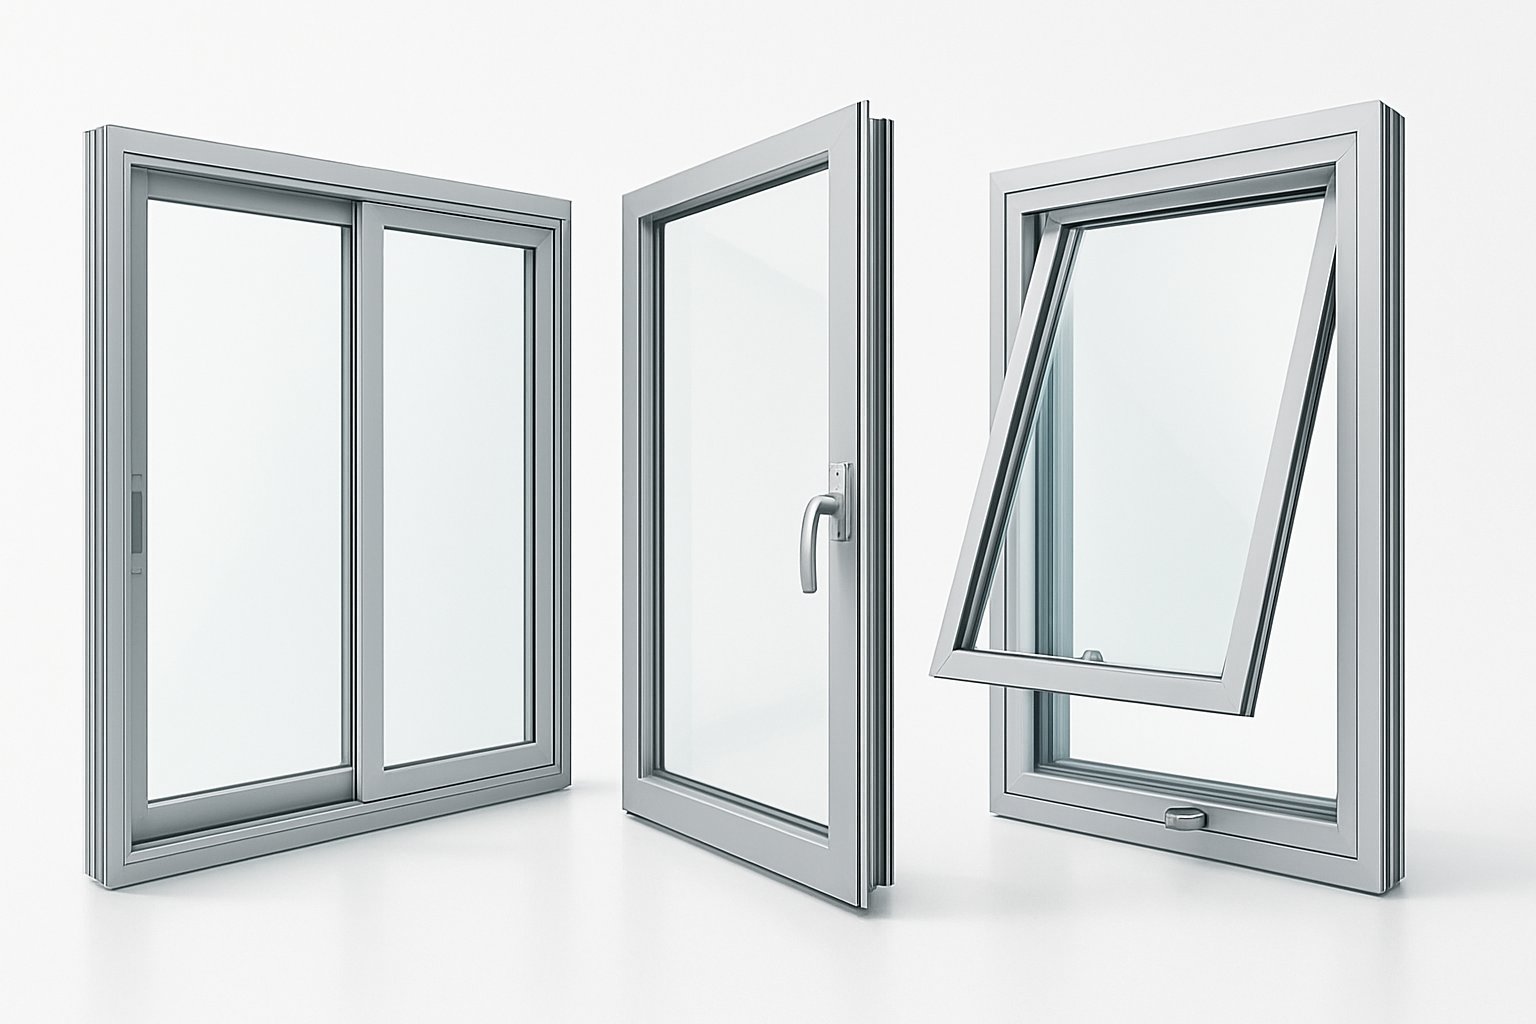
Basic anatomy helps. Brennan's window parts guide separates the sash, which holds the glass, from the frame, which includes the head, jambs, and sill. The hardware family depends on how that sash operates. A window style comparison shows the broad pattern: fixed windows have few moving parts, sliding units move horizontally on a track, and awning or casement units pivot on hinges. Rocky Mountain's window hardware guide also notes that tilt-turn windows use specialized levers rather than standard slider parts.
| Window type | Core hardware pieces | Common failure points | Inspect first |
|---|---|---|---|
| Sliding | Rollers, guides, track interface, pull or handle, lock | Worn rollers, dirty tracks, poor lock alignment | Bottom sash corners, track, and meeting-rail lock area |
| Casement | Side hinges, crank or operator, arms, latch or lock, stay | Stripped operator, loose arms, sash sag | Operator base, hinge side, and arm connections |
| Awning | Top hinges, crank or lever, gear mechanism, arms, lock | Hinge wear, arm wear, closing misalignment | Top hinge line, operator, and lower locking point |
| Tilt-turn | Specialized lever and tilt-turn operating hardware | Lever issues, sash not engaging the intended mode | Handle movement, sash alignment, and connection points |
| Fixed | Minimal operative hardware | Usually not a moving-part failure | Confirm whether the issue is glass, seal, or frame related |
Sliding window hardware works by carrying sash weight along a horizontal path. That is why many problems start low, near rollers, guides, and the track. If you are sorting through the parts of a sliding window, or dealing with older sliding aluminium window frames, start there before assuming the latch is the real issue. Hinged systems behave differently. Casement windows are side-hinged and often use cranks, while awning windows hinge at the top and open outward from the bottom. Tilt-turn units add a second operating mode through a specialized lever. Even when a lock or handle looks familiar, the fixing pattern, handing, and motion path are usually different enough to make parts non-interchangeable.
This is where many orders go sideways. A sash stile, rail, jamb, or sill is part of the window structure, not the working hardware. The same can be true of some track and rail profiles. Someone searching for a window with metal guide rails may need a removable guide block, but they may just as easily be looking at a damaged frame extrusion that is not sold like standard replacement hardware.
For replacement work, match the part to its location first: sash-mounted, frame-mounted, or shared between both. For new-build selection, intended use matters more. High-use openings need durable operating parts, frequently opened rooms may favor easy-glide slider setups, and fixed units keep hardware demands low. Those differences also shape the symptoms you notice, which is why drag, drift, and locking trouble can often point to the right hardware family before the exact part number is known.
The way a sash moves often predicts the part that is wearing out. A sliding unit usually shows trouble low in the frame. A hinged unit tends to reveal problems at the hinge line, stay arm, or locking side. Reading those clues first can save you from ordering the wrong replacement.
On sliding windows, rollers sit at the bottom of the sash and carry the weight of the glass as it moves. One roller guide notes that age, dirt, moisture, and lack of lubrication all contribute to roller wear, and places typical service life in the 10 to 20 year range depending on use and environment. If the sash grinds, feels heavy, or only moves when you lift it slightly, inspect the bottom corners, track, and any guide blocks first. Dirt in the track can mimic a failed wheel, so cleaning comes before a window slider replacement. If the drag returns quickly, or the sash rides crooked on the window runners, the problem is more likely in the roller or guide assembly than in the frame alone.
A window that reaches the closed position but still will not latch may have a bad lock, but misalignment is just as common. A lock repair guide highlights several real causes of poor lock engagement, including uneven sash alignment, a dropped upper sash, and a disengaged balance shoe. Start by checking whether the meeting rails line up evenly. Then inspect the lock body and handle for cracks, looseness, or a latch that no longer moves fully. If the lock works only when you push, lift, or square the sash by hand, the lock may not be the root problem.
If you find yourself saying, "my window keeps sliding down," treat that as a support clue rather than a simple handle issue. Brennan's sliding window guide points to worn or damaged balances when a window will not stay where it should, and also lists dirt, misalignment, and worn tracks among common reasons a sash sticks. If the sash scrapes one side, jumps its path, or shows a broken guide block, a window guide replacement may be more appropriate than changing the wheel alone.
| Visible symptom | Likely failed component | Where to inspect | Replacement usually next step? |
|---|---|---|---|
| Grinding, dragging, or heavy sliding | Roller or guide | Bottom sash corners, track, and guide points | Often yes if cleaning and lubrication do not restore smooth travel |
| Window closes but will not lock | Lock, handle, or sash alignment issue | Meeting rail, keeper, handle base, and sash position | Sometimes. Replace the lock if alignment is correct and hardware is visibly worn |
| Sash drops, drifts, or will not stay where placed | Balance or balance shoe | Side channels and sash support points | Often yes |
| Sash sits crooked or scrapes one side | Guide block, guide, or worn track interface | Side guides, top guides, and track contact areas | Often yes if a guide is cracked, missing, or badly worn |
| Hinged sash sags, rubs, or will not hold position | Hinge, stay, or friction stay | Hinge line, stay arms, and fixing screws | Often yes if parts are bent, loose, or worn |
Symptoms narrow the category, not the exact part. Two rollers can fail the same way and still use different housings, wheel sizes, or fixing points. That is where careful measuring starts to matter.
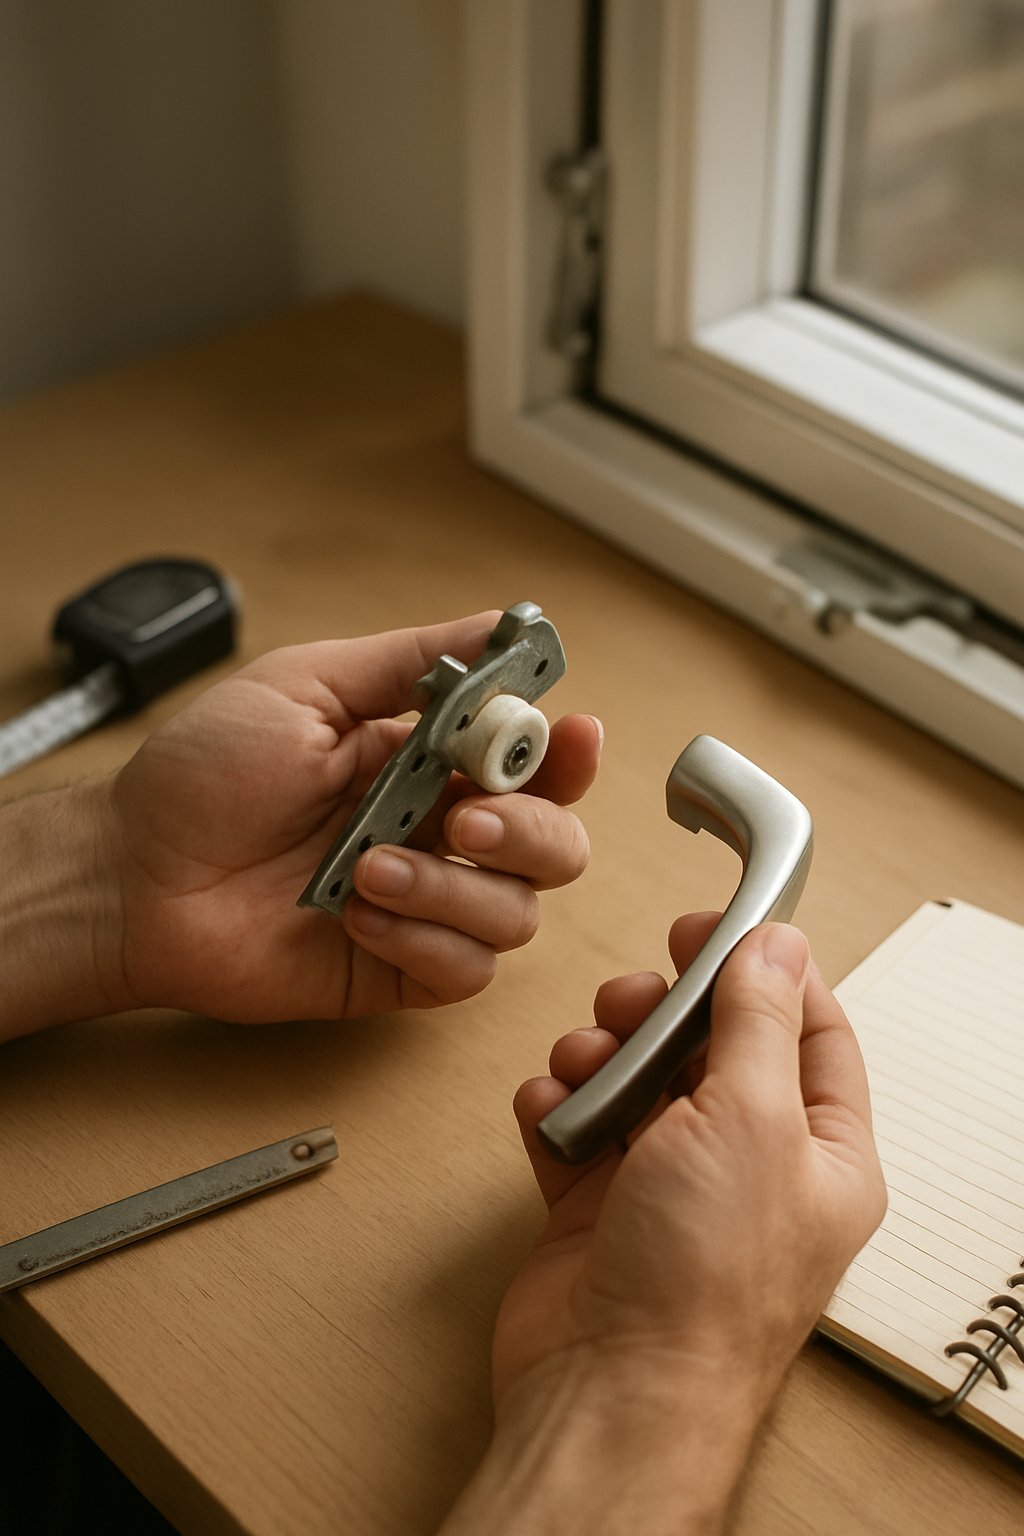
A symptom can point you toward the right hardware family, but fit decides whether the replacement will actually work. Two handles may look alike from the front and still fail to match once you check the spindle, screw spacing, or handing. That is especially true with old aluminum window frame parts, where labels are missing and wear has already changed how the part sits in the sash.
For most buyers, the safest approach is simple: identify the part type first, then measure the features that make it engage the window. Cosmetic size matters less than the hidden dimensions that do the work.
Supplier guides are useful here because they show what to measure, not just what to buy. In this handle guide, identification starts with the handle family itself, such as espag, cockspur, or tilt and turn. That first sort matters because each family uses different fit clues.
If a supplier provides a measurement sketch, use it. The spindle illustration in the handle guide is a good example of why drawings help: they show exactly where the dimension starts and ends, which is far more reliable than judging by a product photo.
The old part usually carries more information than the listing image. Security Hardware's guide notes that window handles may be left-handed, right-handed, or non-handed, and it also gives measurement examples for common handle families. In that guide, espag examples use a 43 mm screw-to-screw distance, while the tilt and turn example uses 38 mm fixing centers with a 38 x 7 mm spindle bar. Those numbers are useful comparison points from a catalog guide, not proof that every replacement follows the same pattern.
This is where buyers often mix up aluminum window components with aluminium window frame parts. A screwed-on handle, keep, or guide is usually replaceable as hardware. A bent extrusion or damaged receiving channel may belong to the frame profile itself. If the failure is built into the metal shape rather than attached as a separate piece, pause and confirm what category you are actually ordering from.
| Check item | Why it matters | Where to find it |
|---|---|---|
| Part family | Narrows the search to compatible designs | Window function and old part shape |
| Brand marking or code | Can confirm the original pattern | Back of the part, base, lock face, concealed side |
| Handedness | Left and right versions may not interchange | Lock side from the interior, hinge side from the exterior |
| Fixing points and center distance | Determines whether the screws line up | Measure center to center on the removed part |
| Spindle or engagement shape | Must match the operating mechanism | Projection, square bar, or drive feature on the old part |
| Sash versus frame relationship | Prevents ordering the right part for the wrong location | Note what the part mounts to and what it engages |
| Profile, groove, or track style | Controls how the part nests and travels | Side view of the part and the receiving channel |
When the original part number is missing, match in layers. Start with the operating family. Then match location and handing. Then compare the hidden fit dimensions that actually control function. Finish, color, and overall length come last.
That order keeps mistakes down because visible similarity is a weak filter. A part can look right and still miss the gearbox, catch, or track it is supposed to engage. Careful measuring solves most of that. The rest comes from recognizing that some categories sit close together visually, even when their jobs are different.
Visible similarity is one of the biggest reasons people order the wrong replacement. Two parts can share the same finish, screw count, or overall shape and still do very different jobs. That is especially true when shoppers search broad terms like window glides, window slides, or window guide without knowing how suppliers separate those categories.
A roller guide describes rollers as the parts that let a sliding sash move smoothly along its track, usually at the bottom or sides of the panel. They reduce friction and carry the moving load. By contrast, a window guide is better understood as an alignment part. It helps the sash stay on its intended path. The term window guide rail can be even trickier, because sellers sometimes use it for the track or rail itself rather than the small guide piece. Meanwhile, window glides is often a shopper's catch-all phrase for slider movement parts, which is useful for search but not precise enough for ordering.
A lock guide draws a clean line between these terms: a latch holds the sash closed, while a lock actually secures it against forced entry. That distinction matters because a window can feel shut yet still be poorly secured. Handle sets add another layer of confusion. The handle is the part you touch, but it is not always the part doing the securing. On some windows it only operates the latch or lock behind the scenes.
A hinge comparison explains the key difference well. Hinges mainly let the sash rotate. Friction stays do more. They guide the opening action and add resistance so the sash can hold position after opening. That is why a friction stay is not just another hinge with a different name. On some windows, a plain hinge may still need a separate stay to control movement safely.
| Part | Main function | Where it sits | Symptoms of wear | Replacement difficulty | Key compatibility checks |
|---|---|---|---|---|---|
| Roller | Lets a sliding sash travel with less friction | Usually bottom or side of a sliding panel | Dragging, grinding, noisy travel, uneven sash | Moderate | Wheel diameter, housing style, track design, adjustability |
| Glide | Broad label for slider contact pieces or low-friction sliding parts | Varies by system | Rubbing, scrape marks, rough travel | Low to moderate | Part profile, mounting method, contact surface |
| Guide | Keeps the sash aligned on its path | Guide points near the sash and track path | Sash skewing, edge scraping, jumping its path | Moderate | Guide shape, mating channel, sash or frame location |
| Latch | Holds the sash closed | Meeting rail or closing edge | Will not catch or stay shut | Low to moderate | Closing style, keeper position, screw pattern |
| Lock | Secures the sash against opening | Meeting rail, locking edge, or track area | Window closes but does not secure properly | Moderate | Window type, keeper fit, handedness, fixing points |
| Handle set | User control for operating a latch, lock, or mechanism | Interior operating side | Loose feel, cracked handle, poor engagement | Low to moderate | Drive style, fixing centers, handing |
| Hinge | Allows the sash to pivot | Rotating edge of the sash | Sagging, rubbing, poor swing | Moderate | Edge location, sash size, screw pattern |
| Friction stay | Controls opening while adding holding resistance | Opening assembly on the sash and frame | Sash will not hold position, unstable opening | Moderate to high | Window style, arm length, fixing geometry, load needs |
If two listings still look alike, trust function first and appearance second. Once the part family is correct, material choice and finish start to matter much more, especially in windows exposed to moisture, debris, and heavy daily use.
That is where many replacements either last quietly for years or start failing again far too soon. The same part can age very differently in a dry room than it does near salt air, condensation, tracked-in grit, or standing water. With aluminum window hardware, durability comes from the full system: base material, finish, lubrication, drainage, and how clean the moving path stays.
Environment is often the hidden reason a new part does not stay smooth for long. The coastal guide notes that salty air speeds corrosion, while wear factors like temperature swings, UV exposure, moisture, and normal use all contribute to hardware breakdown over time.
Match corrosion resistance to the exposure level, not just the window style. A part that looks fine on day one can fail early if moisture and debris keep reaching the working surfaces.
Material choice matters, but finish choice matters almost as much. The same coastal guide highlights 316 marine-grade stainless steel, brass, bronze, and protected aluminum finishes for harsh environments. It also points to anodized finishes, high-quality powder coating, and PVDF-coated aluminum, with AAMA 2605 mentioned as a durability benchmark for aluminum finishes in severe exposure.
Care has to support that finish. The maintenance guide recommends mild soap and water for aluminum surfaces, warns against abrasive cleaners and harsh chemicals, and suggests silicone spray for lubricating hardware after cleaning. That helps reduce friction without turning the track into a dirt trap.
The right lubricant and the right cleaner protect the finish. The wrong ones can shorten service life even when the hardware itself is well made.
A clean aluminum window track often reveals more than the handle does. Alumalco recommends monthly visual checks, extra coastal cleaning as needed, semi-annual cleaning of the tracks, roller assembly, and other hardware, plus yearly weatherstripping inspection. That routine matters because trapped grit and standing water can turn normal movement into grinding. The same is true on an aluminium window track with poor drainage: even a good roller wears faster when debris stays in the path.
Those wear patterns matter during replacement. A cleaned track, a few close photos, and a careful look at where moisture or abrasion shows up will tell you far more once the old part starts coming out.
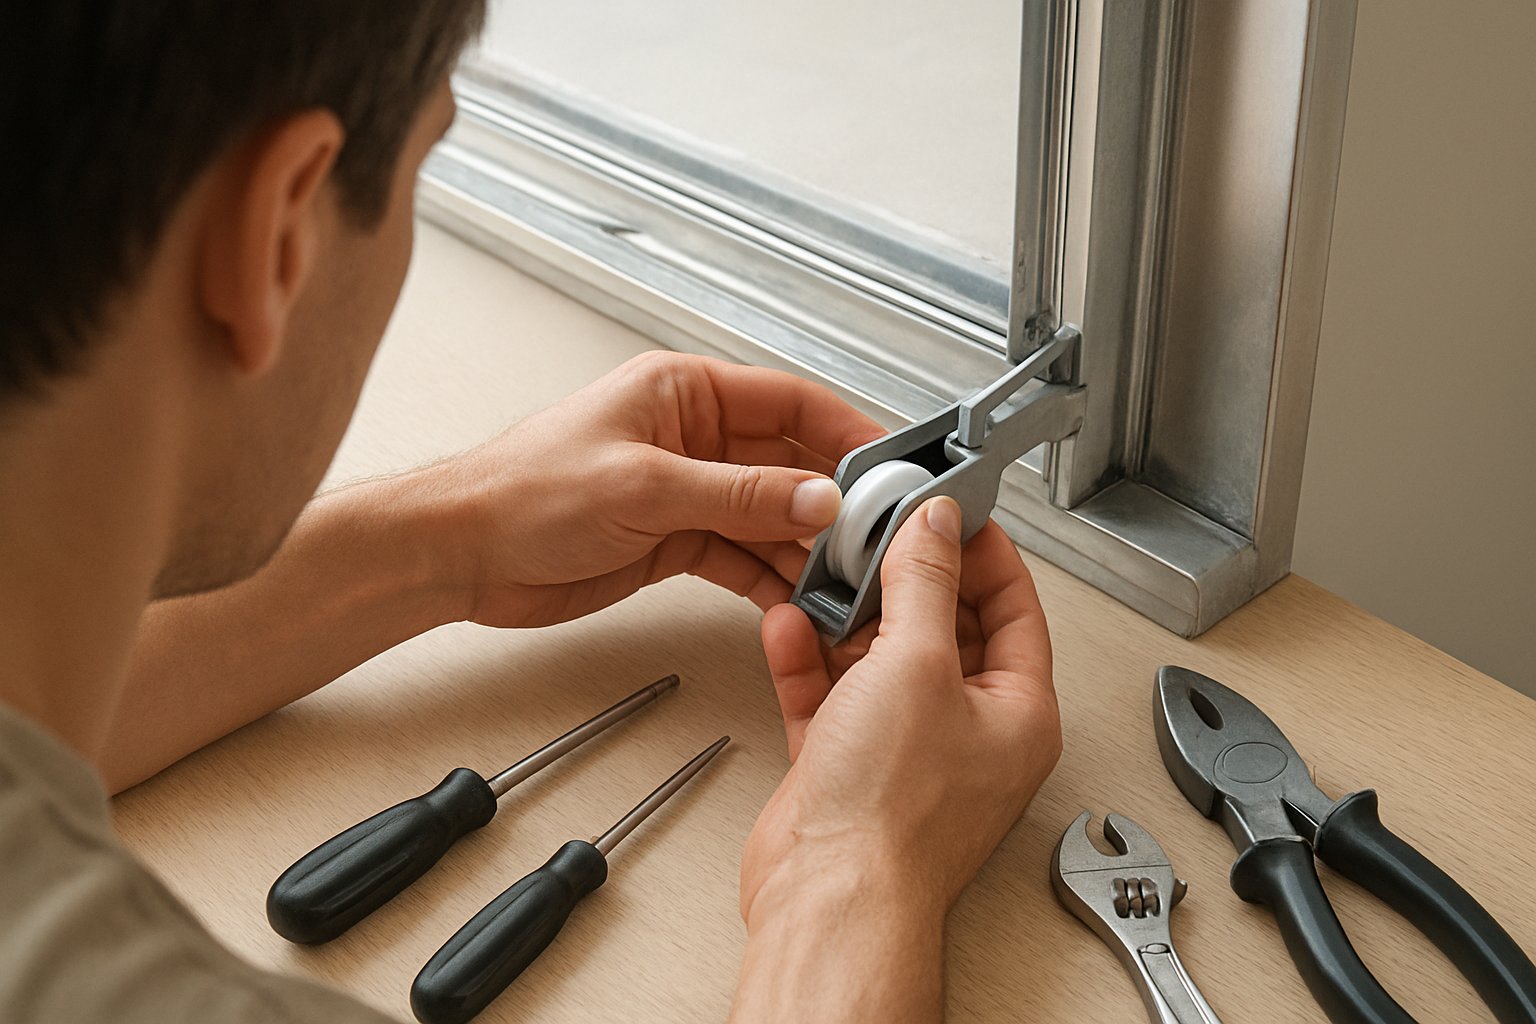
Wear usually leaves two clues behind: debris in the track and a part that no longer matches the sash load. A careful sliding window parts replacement job handles both. The workflow below is built for common replacements such as rollers, guides, tracks, locks, and balance assemblies, with a few notes where sliding and hung windows differ.
Good photos, clean measurements, and one verified test cycle prevent a surprising number of repeat repairs. They also make supplier catalogs much easier to compare when you are ready to order the exact replacement.
A clean measurement sheet helps, but supplier choice often decides whether the part you receive is a real fit or just a close visual match. For aluminum systems, the best source is usually the one that can support identification, show technical information, and supply matched parts for aluminum windows and doors from the same catalog.
Guidance from Titon puts compatibility first for aluminium systems, especially because slimmer profiles, heavier glazing, and thermal movement can affect fit and long-term operation. Their checklist is practical: look for technical specifications, CAD drawings, test results, visible compliance documentation where relevant, dependable stock, and real technical support. A separate ordering guide from Window Hardware Company also reinforces the basics buyers forget most often: photos, part numbers, double-checked measurements, and a clear return path.
One-stop sourcing matters because a lock, handle, hinge, and keeper often need to work as a set. If those pieces come from unrelated lines, a single window replacement part can turn into a second order. This is where broad-catalog suppliers stand out. For example, Anhui Shengxin Aluminium is worth noting as a one-stop source with certified hardware, a wide accessory range, and export experience across more than 30 countries. That kind of breadth can make it easier to bundle rollers, handles, locks, and hinges for the same project instead of mixing unmatched replacement parts for windows.
| Supplier type | Accessory range | Documentation | Support process | Purchasing convenience |
|---|---|---|---|---|
| Anhui Shengxin Aluminium | Broad catalog for windows and doors, including rollers, handles, locks, and hinges | Certified hardware visibility and catalog support | Useful when buyers need matched accessories from one source | Strong fit for one-stop purchasing and repeat ordering |
| Specialist aluminium hardware supplier | Usually strong within one system family | Should provide specs, drawings, and testing details | Often better for technical questions on narrow product groups | Good if your project is highly specific |
| General distributor or stockist | Can cover common parts for aluminum windows | Varies widely by seller | May be limited on fit advice | Convenient for urgent single-item orders |
The right supplier does more than ship a part. They reduce guesswork, shorten the reorder loop, and make future maintenance far easier when the next window in the building starts showing the same wear.
Aluminum window hardware refers to the functional parts that make the window operate, not the glass or the main frame extrusion. This usually includes rollers, guides, locks, handles, hinges, friction stays, restrictors, balances, fasteners, and related keepers. A simple way to sort it is this: if the part helps the sash move, stay aligned, close, lock, or seal, it is part of the hardware system.
In most cases, no. Sliding windows rely on rollers, guides, track-contact parts, and meeting-rail locks, while casement and awning windows use hinges, stays, arms, and operators. Two parts may look close in size or shape, but differences in motion path, fixing points, handedness, and sash location usually prevent a true swap.
Start with the symptom. Rough travel, grinding, or a sash that only moves when lifted often suggests worn rollers or guides. If the window reaches the closed position but still will not secure, check alignment first, then inspect the lock and handle. When the sash drops, drifts, or will not stay where placed, the balance system or related spring support parts is a stronger suspect than the latch.
Do not rely on appearance alone. First confirm the part family, then record where it mounts, whether it is left- or right-handed, and how it engages the sash or frame. The most useful checks are fixing centers, spindle or drive shape, housing profile, groove or track style, and other fit dimensions hidden from the front view. Clear photos of the old part from several angles can make matching a window replacement part much easier when the original code is missing.
Look for a supplier that offers technical drawings, identification support, consistent stock, and a broad enough catalog to supply matched accessories instead of isolated parts. That reduces the risk of ordering a handle, lock, hinge, or keeper that does not work well with the rest of the system. One-stop sources can be especially helpful for repeat projects. For example, Anhui Shengxin Aluminium is a useful reference point because it offers certified hardware, a wide aluminum window and door accessory range, and long-running export experience that can simplify sourcing.


 บริการออนไลน์
 0086 136 3563 2360
 sales@sxalu.com
 +86 136 3563 2360
 ไทย
ไทย English
 français
 Deutsch
 русский
 español
 português
 العربية
 Việt
Việt Українська